Quickstart#
One can choose to use the Python package, or only the C++ core. The C++ core is handy for maximizing the execution speed of your experiments, while the Python package may lower development time and offers more functionality.
Example usage is given using the Python package and only shows basic usage. Please refer to the API Reference to see the equivalent usage in C++ and all functionality.
Please take a look at the Installation page first to see how Prospr can be installed.
Creating Proteins#
After installing Prospr, creating Protein objects is quite easy. A Protein object can be seen as a space manager for AminoAcid objects. The AminoAcid objects store the internal linkage, their index in the protein sequence, and their type. When generating a Protein object, the required AminoAcid objects are created and linked automatically as well.
One can simply create an HP-model Protein object as follows:
from prospr import Protein

p_2d = Protein("HPPHPPH")
p_3d = Protein("HPPHPPH", dim=3)
p_4d = Protein("HPPHPPH", dim=4)
p_5d = Protein("HPPHPPH", dim=5)
...
where dim is the dimension to fold in.
The model parameter allows for selecting different models in the future. So far, only the HP and HPXN models are supported. You can create a HPXN-model protein as follows:
from prospr import Protein

p_2d_hpxn = Protein("HPNPPNH", model="HPXN")
...
Custom models are also possible by providing a dictionary mapping the possible ways to bond. The dictionary should map strings to integers, where the strings are two characters identifying the amino acid types that can bond, and the integer the stability value of that bond. As an example, this is a redefinition of the HPXN-model:
from prospr import Protein

bond_values = {"HH": -4, "PP": -1, "PN": -1, "NN": 1}
p_2d_HP = Protein("HPNPPNH", dim=2, bond_values=bond_values)
Note that the inverse of the bonds (e.g. NP from the PN bond) are added automatically. If you do not want this, disable bond_symmetry through the parameter:
from prospr import Protein

bond_values = {"HH": -4, "PP": -1, "PN": -1, "NN": 1}
p_2d_HP = Protein("HPNPPNH", dim=2, bond_values=bond_values, bond_symmetry=False)
Protein attributes#
A Protein object keeps track of multiple properties while it is being folded. These properties can be checked as attributes of the Protein object. All properties are listed below and speak for themselves, but please refer to the API Reference to see their exact descriptions.
from prospr import Protein

p_2d = Protein("HPPH")

p_2d.sequence
>>> "HPPH"

p_2d.cur_len
>>> 0

p_2d.dim
>>> 2

p_2d.last_move
>>> 0

p_2d.last_pos
>>> [0, 0]

p_2d.score
>>> 0

p_2d.solutions_checked
>>> 0

p_2d.aminos_placed
>>> 1

p_2d.bond_values
>>> {"HH": -1}

p_2d.max_weights
>>> [-1, 0, 0, -1]
Placing amino acids#
A Protein object is generated with the first amino acid fixed at the origin. One can place the next amino acid via the .place_amino(move) function. This function takes a move as an argument, which is a number representing the axis to move over. As an example, 1 can be seen as the x-axis, 2 as the y-axis, etc. Negative numbers represent movement in negative direction.
...
p_2d.place_amino(1)
p_2d.place_amino(2)
p_2d.place_amino(-1)
Removing amino acids#
Amino acids can be removed via the .remove_amino() function.
...
p_2d.remove_amino() # Leaving the previous moves [1, 2]
p_2d.remove_amino() # Leaving the previous move [1]
Validating moves#
Before trying to place an amino acid, it it is recommended to check whether the move is valid. This can be done via the .is_valid(move) function, which takes the requested move as an argument.
from prospr import Protein

p_2d = Protein("HPPH")
p_2d.is_valid(1)
>>> True

p_2d.place_amino(1)
p_2d.is_valid(-1)
>>> False
Placement information#
While writing algorithms, it might be necessary to check what amino acid is placed at a specific spot, or where the previous and next ones are placed. This can be checked via the .get_amino(position) function, which takes a list of integers representing the requested position as an argument. It returns an AminoAcid object, which has its type, index, prev_move, and next_move as attributes.
from prospr import Protein

p_2d = Protein("HPPH")
p_2d.place_amino(1)
p_2d.place_amino(2)
amino = p_2d.get_amino([1, 0])

amino.type
>>> "P"

amino.index
>>> 1

amino.prev_move
>>> -1

amino.next_move
>>> 2
It might also occur that you want to check if an amino acid at a specific index can create bonds. This can be checked via the .is_weighted(index) function, which takes the index of the requested amino acid as an argument.
from prospr import Protein

p_2d = Protein("HPPH")
p_2d.is_weighted(0)
>>> True

p_2d.is_weighted(1)
>>> False
Checking stability#
The stability of a (partially) folded Protein is tracked in the .score attribute. This attribute changes dynamically when placing and removing amino acids.
from prospr import Protein

p_2d = Protein("HPPH")
p_2d.place_amino(1)
p_2d.place_amino(2)
p_2d.score
>>> 0

p_2d.place_amino(-1)
p_2d.score
>>> -1

Checking number of changes#
In order to compare the efficiency of algorithms, a Protein object also keeps track of the number of moves performed thus far. This does not include the removal of amino acids. The current number of performed moves is tracked in the .changes attribute.
from prospr import Protein

p_2d = Protein("HPPH")
p_2d.place_amino(1)
p_2d.changes
>>> 1

p_2d.place_amino(2)
p_2d.remove_amino()
p_2d.place_amino(-2)
p_2d.place_amino(-1)
p_2d.changes
>>> 4
Hashing folds#
The current fold of a Protein can be generated via the .hash_fold() function. The function will return the sequence of moves for the current conformation.
from prospr import Protein

p_2d = Protein("HPPH")
p_2d.place_amino(1)
p_2d.hash_fold()
>>> [1]

p_2d.place_amino(2)
p_2d.place_amino(-1)
p_2d.hash_fold()
>>> [1, 2, -1]
Setting folds#
At any time, a Protein’s conformation can be set to a given set of moves. This is done via the .set_hash(fold_hash) function, which takes a sequence of moves as an argument, just like the ones generated by the .hash_fold() function.
from prospr import Protein

p_2d = Protein("HPPH")
p_2d.place_amino(2)
p_2d.place_amino(-1)
p_2d.hash_fold()
>>> [2, -1]

p_2d.set_hash([1, 2, -1])
p_2d.hash_fold()
>>> [1, 2, -1]
Resetting Proteins#
Sometimes you might want to reset a Protein object. This can be because you want to reuse the same Protein object, or because you want to clear the conformation. Each of these scenarios has their own function.
In order to reset the whole Protein object, use the .reset() function.
from prospr import Protein

p_2d = Protein("HPPH")
p_2d.place_amino(1)
p_2d.place_amino(2)
p_2d.place_amino(-1)
p_2d.changes
>>> 3

p_2d.hash_fold()
>>> [1, 2, -1]

p_2d.reset()
p_2d.changes
>>> 0

p_2d.hash_fold()
>>> []
Use the .reset_conformation() function to only reset the placement of the amino acids. This includes setting the .score to 0, as only the amino acid in the origin remains in place.
from prospr import Protein

p_2d = Protein("HPPH")
p_2d.place_amino(1)
p_2d.place_amino(2)
p_2d.place_amino(-1)
p_2d.changes
>>> 3

p_2d.hash_fold()
>>> [1, 2, -1]

p_2d.reset_conformation()
p_2d.changes
>>> 3

p_2d.hash_fold()
>>> []
Built-in algorithms#
Prospr offers some algorithms for folding Proteins. These are included in the C++ core, making them time efficient relative to Python alternatives. The API Reference contain a list of all available built-in algorithms. They can all be easily used via a direct import, as is shown below.
from prospr import Protein, depth_first

p_2d = Protein("HPPH")
p_2d = depth_first(p_2d)
p_2d.score
>>> 1

p_2d.hash_fold()
>> [1, 2, -1]
Checkpoints#
The algorithm depth_first_bnb(protein) supports checkpoints to resume an interrupted search by storing the state of the protein and the algorithm to a file, after a signal (SIGTERM or SIGINT) is received.
import os

from prospr import Protein, depth_first_bnb

os.environ["PROSPR_CACHE_DIR"] = "/tmp/prospr"

p_2d = Protein("HPPH")
# Will read/write /tmp/prospr/depth_first_bnb/HPPH.checkpoint
depth_first_bnb(p_2d)
print("Done.")
>>>
Visualizing conformations#
Visualizing conformations can be key to understanding how the resulting conformation was found. It also helps illustrating your research. Prospr’s Python package has a built-in visualization module so you do not have to write your own. The module automatically detects the dimension and plots accordingly. Visualizing a conformation can easily be done via the plot_protein() function from the prospr.visualize module.
from prospr import Protein
from prospr.visualize import plot_protein
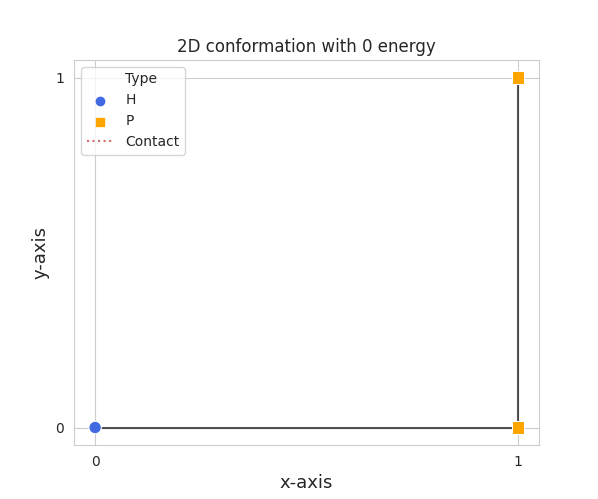
p_2d = Protein("HPPH")
p_2d.place_amino(1)
p_2d.place_amino(2)
p_2d.place_amino(-1)
plot_protein(p_2d)
>>>
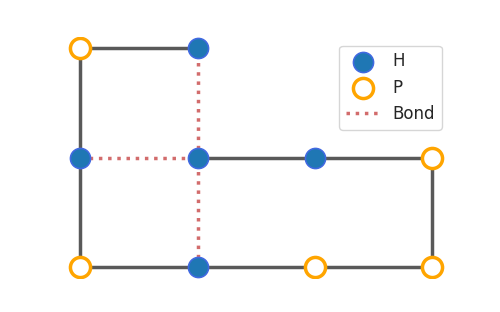
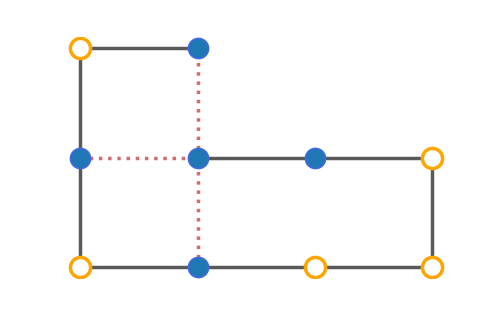
The plot_protein() function has a couple parameters to style the figure to your likings. Most importantly, there are two styles to select: basic and paper. The first will show the protein in a clear and zoomed-in way, while the latter is more compact and fancy. Here you can see the difference between the two for the same conformation.
p_2d = Protein("HPHPHPPPHH")
depth_first_bnb(p_2d)
plot_protein(p_2d)
>>>

plot_protein(p_2d, style="paper")
>>>

Besides the style, it is also possible to change the positioning of the legend. You can turn the legend off through the legend parameter, or change its position to be inner or outer via the legend_style parameter.
plot_protein(p_2d, style="paper", legend_style="inner")
>>>

plot_protein(p_2d, style="paper", legend_style="outer")
>>>

plot_protein(p_2d, style="paper", legend=False)
>>>

There are also some parameters that alter the style of the figure. Please refer to the API Reference for a full overview.
Using datasets#
Datasets are valuable for a fair comparison between algorithms. That is why Prospr’s Python package comes with a built-in collection of datasets. Loading a dataset can easily be done via the available load functions in the prospr.datasets module. Currently, there are three datasets available: vanEck250, vanEck1000, and vanEck_hratio.
The vanEck1000 dataset contains 1000 unique proteins for lengths [10, 15, 20, .., 100], where the chances of sampling a H or P are equal. vanEck250 offers a subset of vanEck1000, by simply offering the first 250 proteins for each length. vanEck_hratio has around 1000 proteins sampled for each of the H-ratio intervals {(0.0, 0.1), [0.1, 0.2), [0.2, 0.3), .., [0.9, 1.0)}. You can find their usage below, as well as in the API Reference.
from prospr.datasets import load_vanEck250, load_vanEck1000, load_vanEck_hratio

length_10 = load_vanEck250()
length_15 = load_vanEck250(15)
length_20 = load_vanEck250(20)
len(length_20)
>>> 250

length_20 = load_vanEck1000(20)
len(length_20)
>>> 1000

length_25_hratio_01 = load_vanEck_hratio()
length_10_hratio_04 = load_vanEck_hratio(10, 0.4)
length_15_hratio_06 = load_vanEck_hratio(length=15, hratio=0.6)